Building a Reliable Turntable with Students: Part 3
Building a Reliable Turntable with Students: Part 3

Note: Sources and recommended reading are listed at the end of this post.
Build a Turntable: Quick Recap of Parts 1 and 2
This is Part 3 of our Build a Turntable series, which means we’re officially in the “make sawdust and commit to choices” phase.
In Part 1, we covered why we needed a turntable and why it earned a spot in the design. In Part 2, my Stagecraft 2 students took over the engineering. Their job was to figure out how we were actually going to build it safely and make it move reliably, with me checking work, asking questions, and being the resident “what happens if” gremlin.
After a few iterations, they landed on a casters-up approach (casters mounted to the floor, platform rolling on top) and a center pivot we already had from a previous turntable. The early plan included a cable or chain drive, but you’ll see where we ended up.
Build a Turntable Under a Deadline: Two Weeks to Tech
When we got back from winter break, we had two weeks until our first tech.
We also hadn’t been able to get onstage before break because concerts and dance productions had the space booked. So we returned to the kind of timeline that makes you speak in checklists and abandon lunch breaks. (I did not abandon my lunch breaks. I clung to them for the 20 minutes of sanity that they are.)
First move: make the turntable real for rehearsals.
We taped out a 14-foot diameter circle on the stage so actors could rehearse spacing immediately. We found the center point, marked it clearly, and taped the full circle. That center became our reference for everything that followed, especially the pivot.
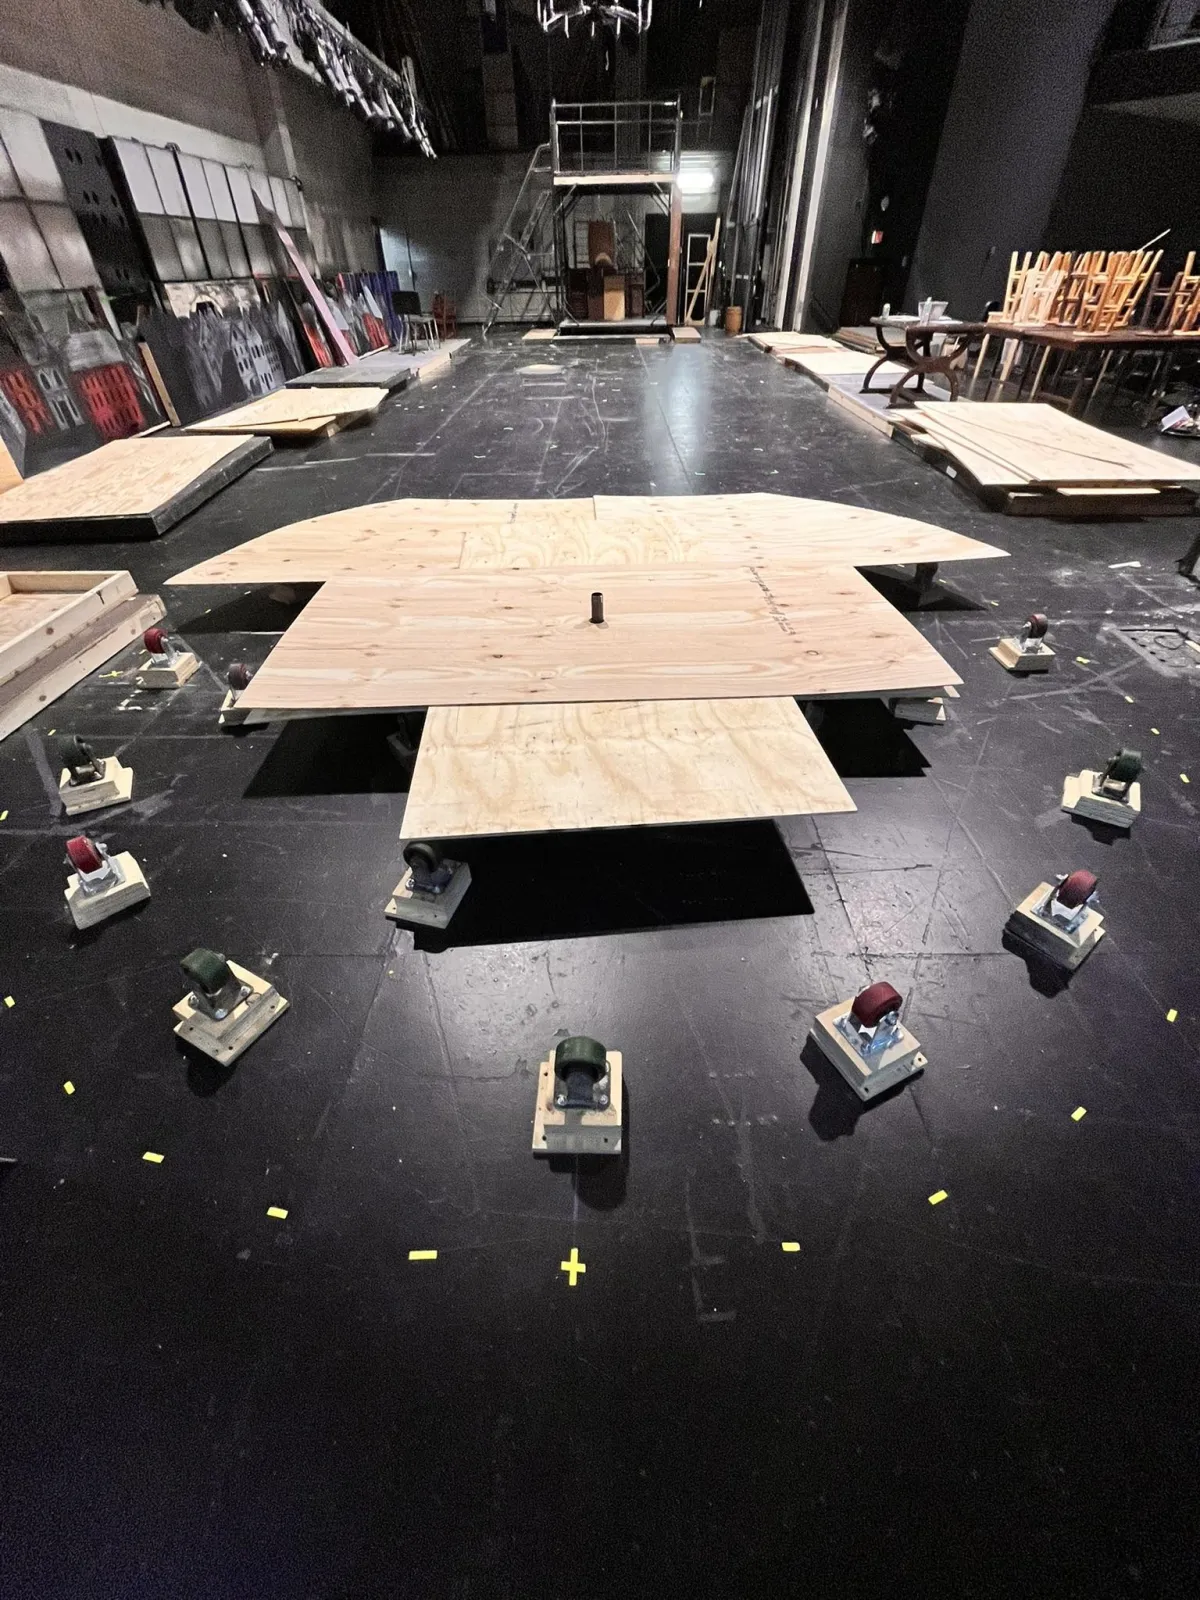
Caster Layout Comes First
If you’re going to build a turntable, caster placement is key.
If casters are off, you’ll get drag. You’ll get bumps. You’ll get wobble. You might even grind a caster down, and nobody wants to explain to the audience why your stage sounds like a shopping cart at a haunted grocery store.
One team took a chalk line and an angle finder and worked outward from center, snapping radial lines on the floor. We started with the cardinal points (north, south, east, west), then added a secondary set of radials, then a third set on the outer half of the circle because the outside edge needs more support.
We mounted directly to the floor for a low profile. Final count: 41 casters plus the center pivot.
Each caster was placed perpendicular to the radial line and screwed down. Our spacing rule was simple: we didn’t want any spot to go more than 18 inches without support underneath.
Turntable Pivot: Sleeve Pipe and a “Guidepost” Trick
For the center pivot, we used a sleeved pipe setup from a previous turntable build. We had purchased a trailer wheel hub (which is also a solid option), but the pipe system we already owned had a huge advantage: it was proven, and the bolt holes were already there.
In our setup, the smaller sleeve was bolted to the floor. The wider sleeve was greased and fed over it so the wider pipe didn’t touch the floor and couldn’t bind or unscrew itself during rotation. The pivot assembly had a wide platform we could screw the plywood into, which gave us a reliable center point without reinventing the wheel.
Then we dropped a skinny pipe through the pivot to act like a guidepost. This wasn’t planned, it was just suddenly the best option to line everything up. It kept our center aligned while we built the deck on top of the caster field.
Build the Deck: Flat Platform, Laminated for Strength
We’ve built framed pie-section turntables before: 2x4 frames, plywood tops, coffin locks, the whole deal. They’re sturdy, but they’re heavy.
This turntable was going to be manual, not motorized, and we wanted it to be just one step up. That meant we needed to keep weight down. So we went with a flat platform style and laminated layers for stiffness.
Our deck plan:
Layer 1: 1/4-inch plywood
Layer 2: 5/8-inch plywood (grain perpendicular to layer 1)
Layer 3: 1/4-inch plywood (grain perpendicular to layer 2)
Here’s the corrected build detail: each layer was made from 9 pieces. We cut those 9 pieces per layer from 7 sheets of plywood by using offcuts from one cut to create another piece. Labeling and organization mattered a lot here.
Before any cutting, we clamped the sheets and drilled a center hole through all layers so the centers would always line up. That single step saved us from a lot of “why is this off” pain later.
Build a Deck Fast: Cut, Sand, Label, Repeat
We marked the 14-foot circle on the first 1/4-inch layer, cut it with a jigsaw, and sanded the entire edge. While that was happening, another team laid out the 5/8-inch plywood.
Because we had center holes, we could stack, align, and trace quickly:
lay the finished layer on the next sheet
line up the center hole
ensure the grain direction runs perpendicular
trace the circle
cut and sand
Everything was labeled by layer number and piece number. We numbered from the center outward. There’s no single right way to label, but there is a wrong way, and it’s called “we’ll remember.”
The cutout period took about two days, with two cutting teams running in parallel and keeping their piles separate.
Assemble in Place: Don’t Lift a 14-Foot Disc
We did not assemble a full 14-foot circle offstage and then try to move it.
That’s how you throw out a back or watch seams flex at the worst possible moment. We did consider building in place and using 16’ 2x4s to lift it onto the caster field, but we didn’t want to purchase 16’ 2x4’s just for the lift.
Instead, we assembled it in position, right on top of the casters, using the pivot guidepost to keep everything aligned.
Sequence:
Drop the center piece of layer 1 in place (guidepost through the center).
Add glue. A solid, paint brush spread layer of wood glue.
Place the 5/8-inch layer piece perpendicular to the first layer and screw it down.
Insert the surrounding pieces and continue laminating, glue and screw as you go.
Yes, we were walking across the caster field. We kept it careful and controlled, because even if the casters are screwed down, tripping on a caster is still a bad day.
Test It: Smooth Spins, Then the Real Weight
Once the bottom and middle layers were laminated, we added the top 1/4-inch layer. At that point, the deck was technically standable, but we limited bodies until the full third layer was on. Once finished, we sanded the perimeter again and did test spins.
The turntable moved really easily. No scenery yet, but the rotation was smooth and encouraging.
Then we built the surround using cutoffs. We trimmed them wider as needed, and the surround gave us a clean squared-off front edge while the turntable rotated inside it.
After the deck was assembled, we removed the guidepost and installed the walls, screwing them directly to the turntable.
Here’s the fun surprise: it held way more weight than we expected. We had three wall sections (about 7 feet wide and around 7.5 feet tall) plus furniture in each section, including a full bar unit with shelving. We did not plan for actors riding it.
But we ended up confident in both the build and the crew.
Movement Plan: We Ditched the Cable Drive
Production reality check: plans change.
We abandoned the cable drive and went fully manual. We bolted handles at the base of each wall section so crew could grab and move it. It worked better than anyone expected.
After a couple days of rehearsal, the crew had it moving smoothly. We also placed one person at the stop point so the crew had a consistent target every time.
By the end of the run, actors were riding it off at scene endings because it was reliable, the crew was confident, and we had repeatable stop marks.
The Three-Day Reality Check
We had three classes per day working on this turntable, 50 minutes each.
From first placement to functional-for-rehearsal, we had it working in about two days. Three tops.
It was fast. It was doable. And it was a strong reminder that students can absolutely handle big builds when you build backwards from the goal, assign real ownership, and keep safety and precision as non-negotiables.
Sources and recommended reading
Turntable/revolve build discussions and caster spacing considerations (ControlBooth threads).
Cross-grain / perpendicular layer strength and stability explanation (plywood layering basics).
Casters-up preference discussion in tech theatre community (practical reasons and common pitfalls).
Turntable caster mounting to stage floor versus strips discussion (practical installation note).
If you are interested in purchasing full build plans for a traveling 12' turntable with a steel understructure, visit our products page here.
If you are interested in instruction for the temporary turntable described in this post, email me at [email protected].
