Handheld Power Tools: What’s Worth the Investment for Your Theater Shop?
Not all power tools are created equal, and not every theater shop needs a garage full of them. After 25 years of building sets, props, and teaching students, I’ve narrowed down the handheld power tools that are truly worth the investment. These tools balance safety, versatility, and budget and they’re the ones I reach for again and again.
Variable-Speed Drill: The Swiss Army Knife of Theater Tools
You don’t need a fancy hammer drill. A basic variable-speed drill with a keyless chuck is perfect for most theater tasks. It can drill holes, strip paint, and double as a screw gun if you’re careful with the speed. Its the tool we use to assemble platforms, flats, stairs, and everything in between. Battery powered drills make moving around the stage easier, but a good corded drill can’t be beat for power, especially if you are working with metal framed set pieces. Battery powered guns have keyless chucks, which are convenient but wear out faster with heavy use. Keep a backup drill on hand for big projects. More powerful corded drills take a little practice to perfect. I’ve watched them twist themselves right out of an unprepared student’s hand. Teach each student to match the speed to the task so you don’t end up with stripped or broken bits.
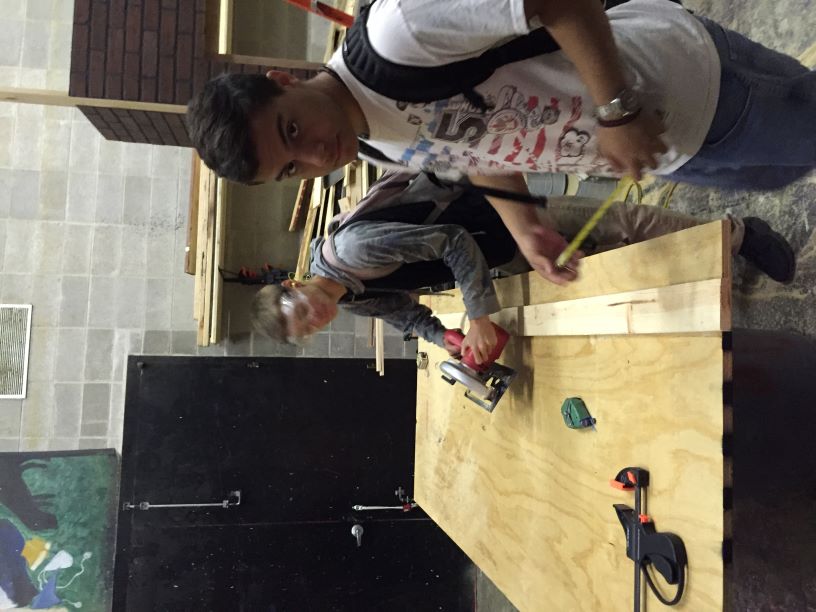
Jig Saw: The Beginner-Friendly Cutting Tool
A variable-speed jig saw with a quick-release blade lock is a must. The quick-release feature removes the temptation to store the saw with the blade still attached (a safety hazard and a recipe for dull blades). When changing the blade is simple, it makes using the right blade for the material easy. It’s great for students because it doesn’t look as intimidating as other power tools. With a little practice, students can cut intricate and detailed pieces. Look for a saw with a laser guide to make straight lines a snap.
Safety Note:
Always use clamps to secure the material.
Wear goggles, flying sawdust is no joke!
Circular Saw: The Workhorse for Straight Cuts
If you don’t have a table saw or panel saw, a circular saw is your best friend for making long, straight cuts in sheet goods. If you don’t have a miter saw, a circular saw is just fine for cutting your linear lumber as well. Look for models with laser guides, they make accurate cutting easier for students. Make sure your students are familiar with the depth and angle guide adjustments. You don’t need 2” of blade to cut through a ¼” piece of plywood.
When to Use It:
Cutting plywood or panels for flats and platforms.
Breaking down large sheets that won’t fit on a panel saw.
Warning:
Circular saws kick back if not used correctly. Teach students to support the material and keep both hands on the saw.
Belt Sander: Smoothing Out the Rough Edges
Belt sanders make quick work of rough cuts, stair edges, and railing handles. They’re aggressive, so they’re best for experienced students or teacher-led tasks. Palm sanders are smaller and easier to control, perfect for new students. They will still get the job done faster than hand sanding, but both power tools require practice to sand evenly. If students stay in one spot with the sanders, you’ll end up with undulating surface areas.
Tips for Safe Use:
Show students how to adjust the belt tension, a loose belt can damage the sander or the workpiece.
Always sand with the grain to avoid gouging the material. The exception is when you are intentionally creating texture for your sets or props.
Dust masks and goggles are non-negotiable, sanding creates a lot of fine particles.
Reciprocating Saw: The Strike and Demo Champion
Also known as a Sawzall or tiger saw, this tool is invaluable for tear-downs (strike) and cutting through tough materials like metal or thick wood. However, it’s not for beginners, the exposed blade and powerful motion require respect and experience. While most people first use this tool for strikes, I have come to find it very useful in builds as well, and even in some more artistic creations. The options for blade length and specialty cuts make it a surprisingly useful tool in the creative process.
Safety First:
No blade guard means extra caution. Always unplug the saw when changing blades.
Use clamps to secure the material, this saw can jerk unexpectedly.
Bonus Tool: Impact Wrench (If You’re Feeling Fancy)
Got lots of legs to bolt in place? Changing casters on the turntable? An impact wrench looks like a drill but acts like a socket driver. It’s fantastic for assembling and disassembling scenery with lots of bolts, especially if you’re on the road.
Budget Note:
Not essential for small shops, but a game-changer if you frequently assemble and strike sets.
Teaching Students to Use Power Tools Safely
Power tools can be intimidating, but with the right approach, students can learn to use them confidently and safely. Here’s how I do it:
Demonstrate First: Show them how to use the tool before they touch it.
Start Slow: Let them practice on scrap material.
Supervise: Always have an experienced person nearby.
Enforce the Rules:
Goggles on before the tool turns on.
No loose clothing, hair or jewelry, it can get caught in moving parts.
Unplug tools when not in use.
Budget-Friendly Power Tool Tips
I’ve built entire sets with just a drill, a jig saw, and a circular saw. Fancy tools are nice, but skill and creativity matter more. You don’t need to break the bank to equip your shop. Here’s how to save:
Buy Used: Check Craigslist, Facebook Marketplace, or ReStore for gently used tools. Make sure they are in good working order with no damage, though.
Start Small: A drill, jig saw, and circular saw cover 90% of basic tasks.
Borrow or Share: Partner with your school’s woodshop or art department to share resources.
Final Thought: The Right Tool for the Right Job
Power tools can make your life easier, but they’re not magic wands. The key is choosing the right tool for the task and teaching students to use them responsibly. Start with the basics, prioritize safety, and build your toolkit over time.
Our first Stagecraft 1 build project every year are rehearsal cubes. Simple, versatile, and invaluable in a theater. They also can be constructed to use every power tool students will need to start. Here’s a link to the Rehearsal Cube Build Package from Backstage AIC. Students love practical projects and this will allow you to gauge tool use, materials management, safety and team work early on.
Question for You:
What’s the one power tool you couldn’t live without in your theater shop? Share your favorites in the comments!